
Get Hand prints Here!
Child’s Reverse Mold Print
Thought About Your Child’s Handprints?
Have you ever thought about hand prints? No, not on the windows, mirrors, etc. But the kind of hand prints that you can immortalize. (I have been known to immortalize my baby grandchild’s kiss marks on the sliding glass doors for great lengths of time) Hand prints can be baby, child, mom, dad, grandparents, dog, cat, and even a newborn colts.
Tips for Prints in Clay
Here are some tips for a hand print in clay. Either go to a potter (someone who works in clay) a school/college or look up a pottery supply house in your vicinity.
Items You Will Need For Handprints in Clay
- ‘low fire clay’ in a 25 pound bag. It comes in white or terracotta. You think you won’t need that much, but once you get started doing this you’ll use it up quickly!
- When you find the clay, ask if they will fire items for you. If they won’t, then find a ‘paint-a-plate-yourself’ business. They do low firing in their kilns and may let you put your dried clay item in their kiln. (Never wet or it explodes on everything inside their kiln….not good for your relationship with them).
- You’ll need a rolling-pin or something to flatten the clay like you would dough. Also
- buy some ‘duck cloth’ at a fabric store, about one yard.
Rolling Out the Clay
Lay down your duck cloth on a flat surface, use a 2 foot piece of dental floss to cut off the end of the 25 pound block of clay and
- cut it at 3/4″ thick. Close the bag back up so the clay does’t dry out.
- Roll out the clay to 1/2″.
If you see a raised up small ‘bubble’ in the rolled out clay, pop it with a pin, push the air out gently and smooth it. Don’t let the clay sit for more than 5 minutes on the duck cloth until you put a print into it as it will be harder to get a good print.
Time for the Hand Printing!
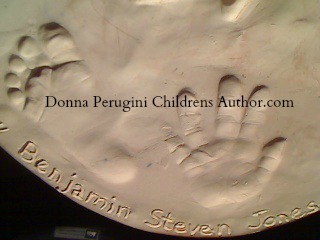
Put the child’s hand on the piece of clay and press each finger and the heel of the hand deep into the clay. If you’re doing this with a newborn, be careful not to ‘break the baby’. If you can get the baby’s hand while they’re asleep or just waking up, it’s easier. Of course another person will be holding the baby while you guide the hand on the clay.
- (Make sure the hand print is NOT on the edge of the clay as it will develop a crack there). You’ll need to
- clean up the rough edges of the clay, or make it a shape around the hand print with a cutting tool (knife) IE: a heart with the hand of a baby in it and enough room to write around the hand print.
If the print is not what you want, cut a new piece. You’ll have a better chance at no bubbles in the clay. (Bubbles also blow up causing ’carnage’ in the kiln). The discarded clay can be kept in the bag with the wet clay block. Lay it on top and don’t smash it into the block. Close the bag.
Remember to Put This on the Print
- Take the time to write the name of the person and date on the front of the print with a dull pointed pencil on the clay.
- Don’t push too hard on the pencil. You just want it deep enough to read after the clay is fired.
- Put two holes through the top to pull a ribbon through to hang.
- Make sure the holes are NOT on the edge of the clay as it will develop a crack there).
- Smooth the edges of the clay with your finger, or a damp paper towel.
Clay Drying Time
Let the clay dry on the duck cloth or a cookie sheet, not in direct sunlight (it might crack while drying too fast). It will take at least two weeks to be sure it is dry. When dry it is brittle and can break. Handle it carefully. Take it to the place that will fire for you and tell them it is low-fire clay. They’ll call you when it’s done! Then you can paint it with acrylic paints and seal with acrylic sealer, both found at a craft store. I suggest you do not paint inside the hand print.
I love doing this for newborns. Of course, once you do the baby, the sister or brother wants their print done too. It’s a great way to just ‘love on someone’ by doing a hand print for them.
Next Week is the Reverse Mold of the Print
The hand print you’ve just made will last forever. That’s not the greatest thing about it though. The greatest part is you can make a reverse print from the fired hand print if you did not paint inside the print. Next time we’ll cover making a reverse print.
Browse through my blog, download free coloring pages of my book characters, Sneak-a-Peek inside the books too!
If you have any question, or would like to see this as a video, please leave me a comment and I’ll answer you. I’d love to hear about your experiences with this project.


Hello!
Thank you for the awesome tutorial. I am trying to learn how to do these handprints and am wondering if you have any other info on what type of clay (earthenware?), and what type of low fire kiln is best. Do you know what temp the kiln should fire at? I am new to this, but eager to learn. Any help is appreciated! Thanks!
Hi, Kari,
You can use earthenware but a better way to look for it would be to get ‘low-fire’ clay that has no grog in it. Grog makes the clay less capable of a fine handprint that shows all the lines in the hand. Any kiln is fine if the kiln is fired to the temperature of the clay you bought. Low-fire clay would be in the cone 06 to 04 firing range. If you buy Terra Cotta (red clay) there is a difference in color as it fires from cone 06 up to cone 1. The lower range will be a orange-toasty brown and the hotter the clay gets, the darker it becomes. Hope this helps!